[Note: I changed the name of this post to something more suitable.]
Back in 1976 and a year out of high school I got a part time job at a single screen movie theater as a projectionist. The first movie I ran by myself was a Roman Polanski movie called The Tenant. It was the third in a trilogy of Polanski horror movies after Repulsion and Rosemary’s Baby. Both films had won critical acclaim. I can only assume this is why the owner of the local theater chain company booked it.
Over the stretch of 6 days we sold 7 tickets, of which 5 walked out during the show. One night we ran the movie for no one. The owner was watching this unfold and by the 7th day, we had a new movie to show. Low ticket sales also meant low concession sales. Minimal staff meant a manager to supervise and work ticket sales, a concessionaire, and a projectionist. On the bright side for the janitor, there was little to clean up.
Spoiler warning. The Tenant wasn’t a happy movie. There is a scene where the main character begins to take on the symptoms of madness that the previous tenant had. Eventually he throws himself out of his apartment window and survives like the previous tenant did. But, not one to easily give up he drags his broken body up the stairs to try again. The second attempt doesn’t work either. But that isn’t the end of it. You’ll have to see it.
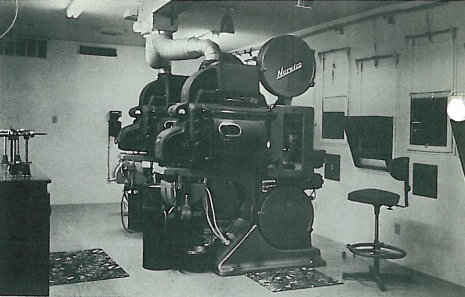
My first theater had two of what were at the time relatively new 35 mm Norelco projectors. At this time theaters commonly used two 35 mm projectors sitting side by side in the darkened upstairs projection booth. Movies were shipped in one or more metal shipping containers in roughly 5 to 7 20-minute reels. Since the Norelco projector used 1-hour reels, three shipping reels were spliced head to tail and wound onto the larger reel. Usually there was only one changeover. We spliced in short preview clips on the first reel. This gave folks time to hear the movie begin and rush to their seats after getting concessions. When customers weren’t bitching about the price of popcorn, they would complain about the previews. We ignored them. That decision was way over our heads.
Two projectors were used to avoid interruptions between reels. Near the very end of a reel, a black spot would appear twice in the upper right-hand corner of the image. The first time was the signal to be sure the lamp was lit and to get the motor rolling on the other projector. Shortly after this was the second appearance of the black spot. This time it was the signal for the changeover. This was the cue to drop the dowser on the first projector and block the light while simultaneously opening the dowser on the other letting light through the next reel. At the same time the sound was shut off from the first projector and activated on the second projector. The result was smooth continuity of image and sound between reels.
At this point, the take-up reel was rewound and put away, ready for the next run. Leaving unrewound reels for the next guy was a major faux pas. Wash, rinse and repeat.
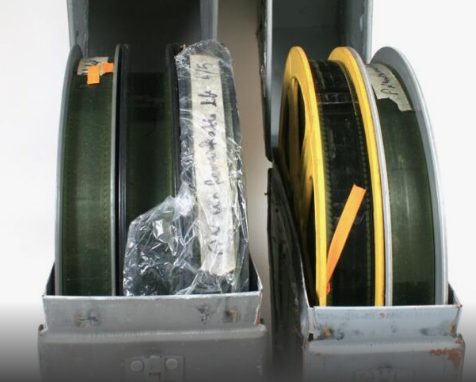
Most movies arrived on 5 to 7 reels in 2 or 3 shipping cans. The more common brand of projectors, Simplex 35’s, were designed to run the shipping-reel sized reels on the upper feed side directly. We’d use our own better-quality reels for use. The Simplex projectors came with carbon-arc lamphouses that required some attention when they were lit up.
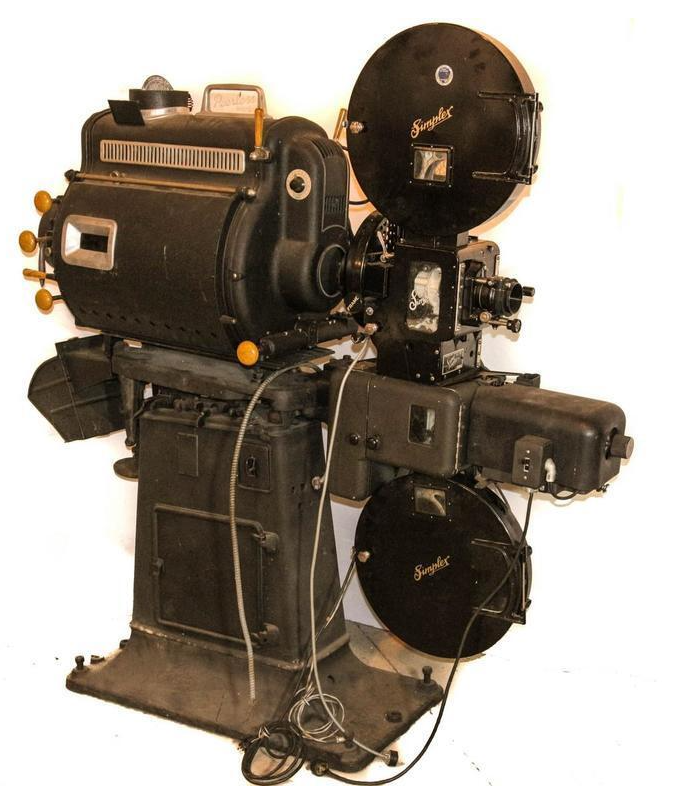
Above is a common example of the Simplex 35 mm movie projector. It is comprised of a lamphouse, the upper feed reel, the intermittent movement and film gate, the spinning shutter, the optical sound pickup is below and slightly behind the image in time. The take-up reel is at the bottom. Between the shutter and the light is the dowser. There was one for manual use and later, one for automatic use. The purpose of these black pieces of thin metal was simply to block the light from getting to the gate where the film passed through. One reason is to avoid projecting an undesired image or white light onto the screen. It’s unprofessional and bad showmanship. The other reason is to prevent light getting to the film if the motor gives out and the film stops in the gate. Lamphouses generate considerable heat and a stationary piece of film will begin to melt within a second or two. Naturally, this fiasco will show up on the screen for God and everyone to see.
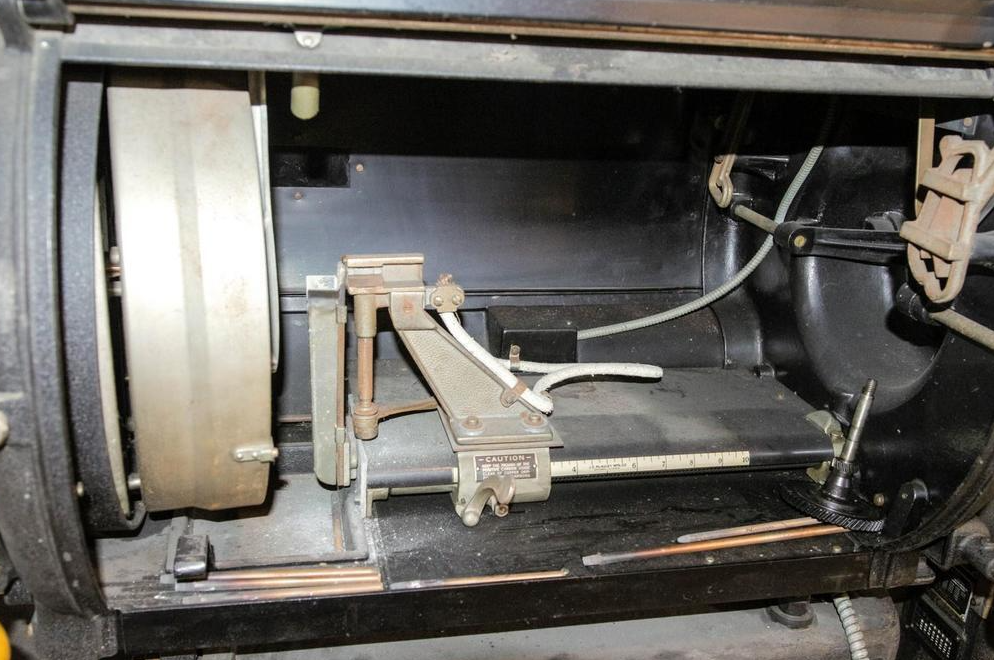
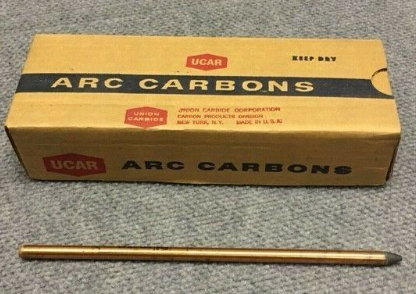
The component in the center (above) of the housing held two copper-clad carbon rods which were slowly fed towards one another with one rod penetrating the mirror. The position of the rods was continuously moved towards the focal point as the rods burned up in the arc. Good ventilation was required. The purpose of the motion was to keep the size and shape of the arc constant and in the focal point of the parabolic mirror. Once the arc moved away from the focal point, the brightness of the projected image would diminish. If the gap between the rods became too long, the arc would wander around and become unstable causing flickering to appear on the movie screen. The arc lamp for our indoor theater used 70 to 80 amps DC. The high DC power was supplied by a vacuum tube rectifier. The projectors for our drive-in theater used 120 to 140 amps DC. Longer throw and larger screen.
The gate mechanism was interesting. At its heart was a Maltese cross intermittent movement. It would twist a sprocket enough to pull the film down by one frame and then leave it there for a short time. While stationary, the shutter blades would alternate letting light pass through and blocking it. The frame rate was 24 frames per second, but to prevent flickering, each frame is shown twice. While the shutter blocks the light, the gate mechanism pulls down the next frame.
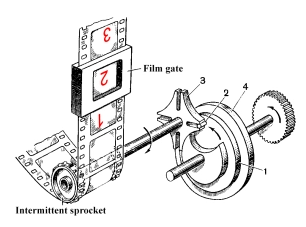
The intermittent movement pulled the film through the “
gate” for steady projection.
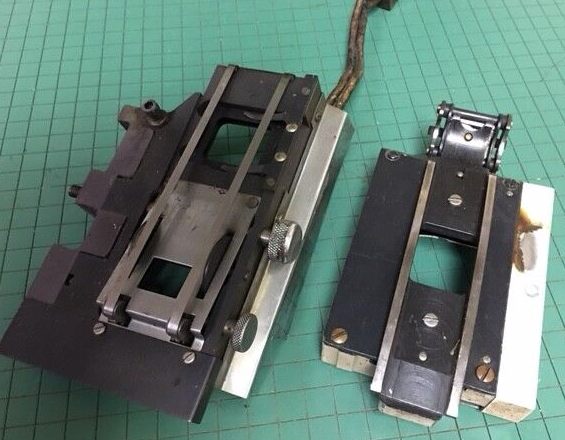
The intermittent movement pulled the film through the film gate and stopped momentarily in time with the shutter. The purpose of the gate was to clamp the film stationary in the focal plane for a moment while the light passes through. It was built to hold the film firmly in place but not adversely affect the movement of the film or damage it. Movie prints are expensive and not always replaceable, especially if they are older. One side of the gate had two smooth, polished steel sliding surfaces for the film sprocket-hole sides to slide on and the opposite side had two flexible steel bands sitting over the polished slides to apply light pressure to the film to prevent chattering.
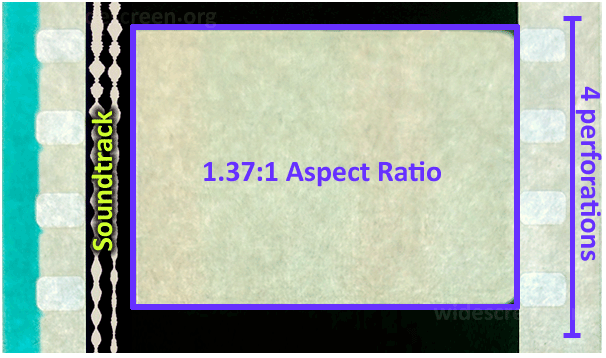
The gate also holds the aperture which determines the shape of the light beam giving the image on the screen. It is just a thin black metal plate that has a precise rectangular hole in it. The idea is to put image on as much of the screen as possible. Apertures are defined by their aspect ratio, or the ratio of length to width. The most common aspect ratios are the normal 1.85 to 1 and the anamorphic wide screen ratio of 2.39 to 1. We used to refer to the anamorphic image as “Cinemascope.” The 1.85 ratio works well both in cinema and television. Movie theater screens were adjustable in width by black curtains called “masking.” There were two positions for the masking- fully open for wide screen Cinemascope and partially closed for the regular format. Theaters could have used fully exposed screens like they do today, but the aesthetics then was to cover unused screen at that time. The 2.39 to 1 Cinemascope format works well in the theater but adjustments have to be made for it on television screens. They will either lop off the left and right sides and convert it to 1.85 to 1, or they will broadcast the movie in letterbox form, preserving the entire image, but making it smaller vertically on the TV screen.
Some theaters use curved screens but most do not. If you think about it, the distance of the film plane to a flat screen is minimum from the film to the center of the screen. This distance, however, increases from the center to the edges of the screen. So, it isn’t possible to focus the center and the edges simultaneously. In practice, the center of the screen is put in focus. A concave screen overcomes this problem. The larger the screen the more obvious the improvement in focus will appear.
Projecting a large image onto a large screen has certain problems to contend with. A large image from a 35 mm frame will magnify any imperfections in the image like graininess and focus but also you will come up against limits on brightness of the image. The image on the film should be what the director intended- perfect and usually it’s quite good. Focus is mostly a theater problem. Focus degrades with image size inherently but also with how well the operator can use the focus knob on the projector.
When a complaint came in about the focus, I would check it right away. Usually, the image on the screen was already at the optimum focus. To show the audience we were attending to the issue, I would crank it way out of focus, then back through focus and to the other extreme. Then I would then bring the image back into focus carefully, demonstrating that the image on the screen was as good as it could get. At one theater we had a 960-seat auditorium with a large, curved screen. The large size of the screen image came from a 35 mm piece of film meaning the magnification was very large. Focus and graininess were always an issue.
The anamorphic lens will take a distorted image from the film and spread it out to give a proper wide screen image. On TV they refer to these movies as letterbox movies due to the wide image but narrow height on a TV screen.
So, what’s the deal with the noise? Projectors make a characteristic clattering noise that isn’t always very quiet. The film is fed to the upper end of the gate at a constant speed, but the film has to stop every 24th of a second so a stable image can be shown twice. The film motion into and out of the gate area goes from constant-feed to intermittent-movement to constant feed-out. To do this, a loop of film is placed a above and below the gate forming two bits of slack in the film. The slack is alternately fed in and out and pulled in by the intermittent mechanism. It’s a bit noisy, but the customers never hear it. There might be other noise from the motors and gearing mechanisms as well.
Platter projection systems eventually came along with better automation for easier use by people with a broader job description in the movie house.
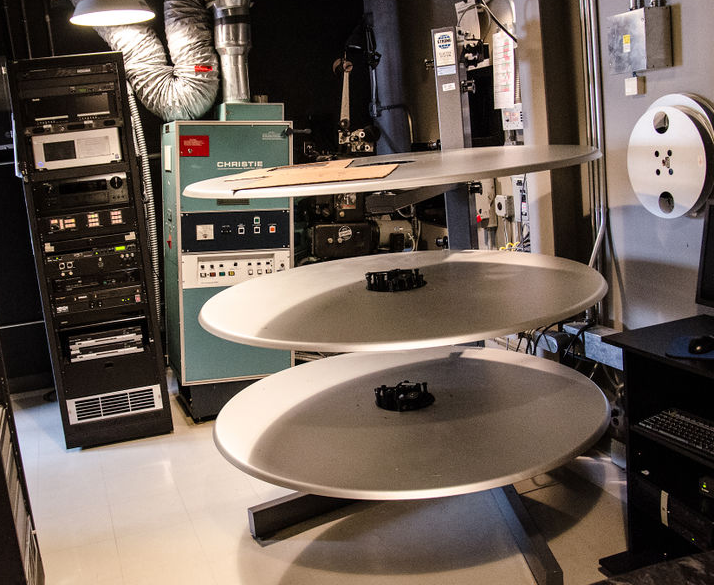
The platter system came to our neck of the woods in the late 1970s. Our platters were air driven so they made a constant whining sound. The entire film was spliced together with heads in the middle and tales on the outside. One platter fed the film to the projector and a second one was the take-up platter. The film fed through a speed control mechanism in the center of the platter and then on to the projector. Out of the bottom of the projector, the film threaded through a speed controller and then rewound on the take-up platter. The third platter was a make-up platter for putting together the next movie. This system was not so good for the projectionist profession but did allow the theater to have a manager run the projectors and take care of everything in the lobby as well. I used to be a manager/projectionist at a duplex theater then later at a 4-plex theater while I was an undergraduate. If there was a power trip and the projectors dropped out, I would have 4 auditoriums of upset folks to content with. The house lights would automatically dim up so the crow could conveniently find their way out to complain. Lucky for me I was in one of the two projection booths getting the projectors running and away from the mob spilling out into the lobby. On the good side they usually bought concessions while pacing in the lobby.
When splicing film reels together it was convenient to mark the splice location along the edge so it could be seen wound onto the reel. We used white shoe polish to mark 2 ft of edge. When we were breaking down a print to ship out, unless there was a mark between reels, you could easily pass the splice as you were rewinding onto the shipping reels. We saved the head and tail leaders and spliced them back on for shipment. This was always done late Thursday night during and after the last show. Any previews had to be returned as well. Over time, movies came with previews attached.
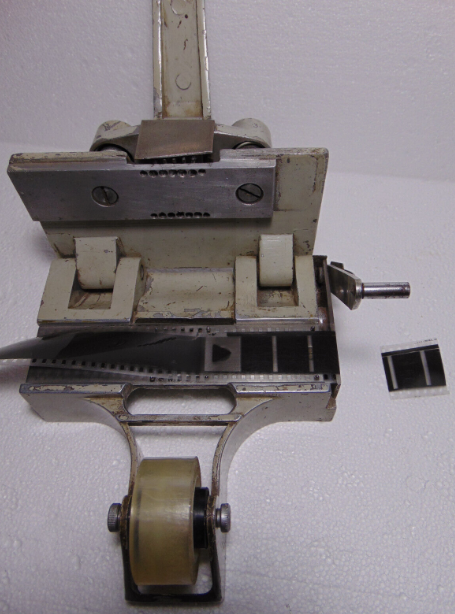
The film lab where prints are made would do lab splices when a new roll of stock was needed in the middle of a reel. These splices were overlapped about 1/2 a sprocket length and were either thermally fused or glued. Normally you never noticed them.
A “normal” movie print has one or two parallel optical soundtracks along one side that passes over the sound head. The sound head consisted of a lensed light source and a photodetector. The soundtrack(s) are black with variable transparent area that changes in proportion to the magnitude and frequency of the sound. Movies came with a single track early on and eventually changed to dual track stereo sound. In recent decades other schemes came along like Dolby sound and others. There are other sites where this is explained in more detail and with copy written graphics.
The Saturday Night fever Disaster.
On the opening Friday night of Saturday Night Fever back in late 1977, I had just started the first showing. In the other theater, I started a sci-fi movie called Coma, written by Michael Crichton. Seeing that they were both running on our platter systems nicely, as manager/projectionist I had to attend to the lobby to check the ticket booth and grab some of the larger bills from the cash drawer and then the same at the concession stand. About 60 minutes later and into the third reel of Saturday Night Fever I went into the booth to check the projectors. Coma looked just fine. What I saw at the other projector floored me. I couldn’t believe it. Never had I dreamed that such a thing was possible.
What I saw was on the take-up platter of Saturday Night Fever. There was part of the film that was half gone across the film width. The film wound up smoothly as usual and the top surface looked smooth as it always did, except for maybe 80 % of a reel where the top half of the print was just gone! It looked like a gutter was gouged into the print. I looked everywhere in a panic for the missing film, many hundreds of feet of it, but it was not to be found anywhere. So I began to look closer at the print on the take-up platter. Where the next reel began (remember the shoe polish?), the layers of the film had a slightly different texture.
Feeling nauseated and incredulous all at once that I had destroyed a print of a blockbuster movie that people were dying to see during the very first showing, I stopped the projector, refunded 210 very hacked-off customers and halted sales for the next show. Turns out this was not really necessary but I did it in panic. Then I called the owner of the theater and explained what had happened. He was already pissed about something- taxes maybe- so my news just threw gasoline on the fire.
While he was on the way, I began to sort out what had happened. By the next day when I very laboriously removed the print, and instantly say what had happened. Early into reel 2 a lab splice had torn halfway across the width of the print, then down the middle for 80 % of the reel. It only stopped when it came to my tape splice between reels 2 and 3. So, this 80 % of reel two had piled onto the floor then at the beginning of reel 3 began to be pulled off the floor and onto the take-up platter where it neatly rolled up between layers of reel 3. Because it was from the top of reel 2 and layered along the top of reel 3, it wasn’t easily visible. Nobody had heard of such a failure before. Usually a print tore completely across and the projector automatically shut down.
The Simplex 35 platter projectors we had were equipped with a failsafe feature below the sound head. By this time, projectors had long had failsafe mechanisms, but they only detected tension in the film. This device did two things- it detected broken film and it detected a thin piece of conductive tape along the edge that would signal the automation to close the dowser and shut off the lamp to block the light, shut off the sound, dim up the background music (Neil Diamond, usually), signal the house lights to dim up, reset the masking curtains, and close the main curtains in front of the screen. The sensor consisted of two curved paddles that sat in the film path and across and against the film as it left the projector below the sound head. The stationary paddle picked up the shut-down metal tape that triggered the automation and the other spring-loaded paddle sensed the loss of film coming out of the projector. But it only sensed the presence of one side of the film. If the other side was somehow missing, there would be no film breakage detected. And that’s what happened.
The big problem was that we had an empty screen and needed a movie to throw on it. All 1400 of the Saturday Night Fever prints were in use across the world. There were no more, or so we were told. What we did to keep butts in seats was to show one print in 2 theaters simultaneously. Both projectors had Selsyn motors that would cause the two projectors run synchronously without creating or losing slack in the print between projectors. We called it “running in synch”. So, for 6 days we ran Coma on both screens. The cast included Geneviève Bujold, Michael Douglas, Elizabeth Ashley, Richard Widmark, and Rip Torn. Among the actors in smaller roles were Tom Selleck, Lois Chiles, and Ed Harris. It was pretty good.
